Sunday, 1 June 2014

Mandalas

As promised here are just a few of the beautiful crochet mandalas we made at the recent workshop. I'm just waiting on one more to be finished then I'll be sending them off to join the rest of them at Yarndale.
I think they look great, they're very reminiscent of granny's doilies but with a fresh modern feel to them. They can be done in any size, with any yarn and look wonderful as coasters or placemats.
I'll be running this workshop again soon, please contact me for details.


Tuesday, 27 May 2014

Thursday in the cabin


I had a lovely day thursday hidden away in the cabin with a few of my friends road-testing the layout for suitability and practicality. We managed to fit in nicely, with ample room for 6 crocheting as long as there was no dancing going on ;).  The only problem with workshops for friends though is that we were so engrossed in what we were making that the time flew by. We were supposed to be finishing around 3 but finally realised the time at 5.30! Note to self, put batteries in the clock! 

We made some lovely mandalas to send off for Lucy to display at Yarndale ,  I hope to have some pictures to share in a few days.

I hope to be offering this class soon, the mandalas make beautiful coasters, table mats or just decorations. Please contact me for details, although I will be advertising shortly.

 On another note in my minds eye I can see some delicate white star-shaped ones hanging in the windows at Ch______s. ;)

Thanks Ladies for your time, you know who you are. And thanks too to my little birdhouse full of blue-tit babies who provided the soundtrack for the day, along with the blackbirds pitter-pattering across the roof! 

Monday, 26 May 2014

A new start


I've dusted off my old blog, revamped and refurbished it and we're ready to go again. What do you think to the new look?
I've done so much since I last posted on here that there seems little point to trying to catch up so I'm just going to start again once I've done a bit of housekeeping.
First my cabin needs a spring clean, which hopefully won't take too long. Next I'm hoping to start some workshops so watch this space :)

Friday, 22 February 2013

And finished.

Thanks to inspiration from my friend Margaret my bag is now finished.

I've added eyelets to the 'points' of the bag, brass to co-ordinate with the gold bits in the cream fabric. I was a little concerned at hand stitching handles on, I wasn't sure they would be strong enough somehow and more importantly I wasn't sure how they would impact on the look of the bag overall as I had none of the main fabric left to make them with. But then I saw Margaret's mini version and I was inspired.

I then used some cream and gold rope I found to make dual purpose handles. Basically I decided on the longest I would need the handles and measured the length from my shoulder to where the bag would be, then I doubled it and added a few inches to allow for a knot. I cut 2 pieces this length and threaded one through each pair of eyelets on the back and on the front of the bag and knotted them to form 2 separate loops. I'm not sure how clear that is, hopefully the photo helps!
 
By doing it this way I now have 2 different ways of wearing this bag. I can either just hold one of each loop to give me a long handled bag to sling over my shoulder.


Or I can hold both parts of each loop to give me a shorter bag that can easily be carried either just in my hand or looped over my elbow.

 
Very happy :)

Thursday, 21 February 2013

Japanese bag (almost) finished

I've finally finished sewing up the bag and I'm very pleased with it. I just need to sort out some handles now! I really wanted to do handles out of the gold and cream fabric wrapped around the coloured batiks, but unfortunately I've run out, and have no idea where I got it from, so its back tothe drawing board with that one. I'm not going to rush it though, I like the bag too much to rush and spoil it. I think it would look really good with smaller squares too. Maybe christmas pressents?
Right, so let me try to explain how its done! (ignore the perspective issues, each square is the same size.

First of all you need to sew your squares together as follows, (ignore the letters on the photo for the moment!)
 
 
So with your 22 squares you need to start with 2 squares turned diagonally, then 3 squares, then 2 squares, and so on till they're all used up.
 
Now comes the complicated (to explain) bit.
Fold it all in half along the x-x line, through the 2 square line.
Then you need to oversew the line joining A-A to B-B, then a-a to b-b.
Then you need to pull points B and D together and sew from there to point C. And also from b/d to c. Then also from BF to E, and bf to e.
Finally pull DF together and sew to X, and df to x.
 
now you should have something that looks like this:-
 
 
Now by sheer fluke you can actually see the bag from the same side as the flat version! Hopefully this will help you to see how it all goes together. Now just have to find/make some handles!


Wednesday, 20 February 2013

I've also been making...

Taglets!


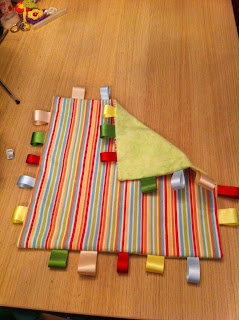
Now to be absolutely truthful I had no idea what one was (and technically they are called taggies, or tag blankets but I've renamed my ones), until someone asked me last week if I could make one. Never someone to admit my lack of knowledge I first googled them before telling her of course I could! They come in all sorts of shapes, sizes and materials, but my ones are made from 100% cotton flannelette with double-faced satin ribbons and are roughly 12" or 30cm square, and each one comes with a free initial (as you can just about see on the middle one above.)


I have loads of colours to choose from for both the fronts and the backs (and the ribbons/tags), so if you're interested in buying any pop over to the facebook page and have a nosy around.

Tuesday, 19 February 2013

Its been a while....

but I've been so busy, so here's a long post to update you.

Firstly I've been really struggling with the Japanese folded patchwork bag. I tried and tried to work out or find out how on earth the pieces all went together and in the end I posted on the blog of the lady where I'd seen the original picture. Much to my surprise she emailed me back with a diagram of how the squares went and then there was no stopping me! I'd been trying to make it so much more complicated than it needed. It's still taking a while because I'm trying to fit it in around everything else, but we'll get there! I'll post a photo of it in its flat form before I sew it into a bag so you can see how it should look.

Secondly over on facebook the 'A Couple of Crafters' page is really taking off so I've been busy with stuff from there. In particular with the individual bunting flags.

The idea is that each little triangle is completely separate, it can be removed altogether, moved into a different place, or even turned around to show the other side as each one is also reversible.
 
They are held together with cord loops and buttons and are easily separated.

So with just the words 'happy birthday', a name, (Lauren, my granddaughter, in this case), a couple of number flags ('1' and 'st'), and 3 extra letters, 'o', and 's' and ''s', you can make all these variations! (Unfortunately they are a little difficult to photograph as they are quite long!) 
So, with just those letters you could have 'Happy 1st Birthday, Happy 1st Birthday Lauren, Lauren's Bithday, Lauren's first birthday, Lauren is 1 today, or just a plain simple Lauren, for when it isn't Lauren's birthday!


Added to that, I now only have to add four flags,  an 'i', an 'm', a '6' and a 'th', and you could use the whole lot again for her brother Liam when he's 6 later in the year. (we already have the L and the a from Lauren's name)
.
The bunting is completely washable too so will last for years. Prices and ordering instructions are over on the facebook page here