Friday 22 February 2013

And finished.

Thanks to inspiration from my friend Margaret my bag is now finished.

I've added eyelets to the 'points' of the bag, brass to co-ordinate with the gold bits in the cream fabric. I was a little concerned at hand stitching handles on, I wasn't sure they would be strong enough somehow and more importantly I wasn't sure how they would impact on the look of the bag overall as I had none of the main fabric left to make them with. But then I saw Margaret's mini version and I was inspired.

I then used some cream and gold rope I found to make dual purpose handles. Basically I decided on the longest I would need the handles and measured the length from my shoulder to where the bag would be, then I doubled it and added a few inches to allow for a knot. I cut 2 pieces this length and threaded one through each pair of eyelets on the back and on the front of the bag and knotted them to form 2 separate loops. I'm not sure how clear that is, hopefully the photo helps!
 
By doing it this way I now have 2 different ways of wearing this bag. I can either just hold one of each loop to give me a long handled bag to sling over my shoulder.


Or I can hold both parts of each loop to give me a shorter bag that can easily be carried either just in my hand or looped over my elbow.

 
Very happy :)

Thursday 21 February 2013

Japanese bag (almost) finished

I've finally finished sewing up the bag and I'm very pleased with it. I just need to sort out some handles now! I really wanted to do handles out of the gold and cream fabric wrapped around the coloured batiks, but unfortunately I've run out, and have no idea where I got it from, so its back tothe drawing board with that one. I'm not going to rush it though, I like the bag too much to rush and spoil it. I think it would look really good with smaller squares too. Maybe christmas pressents?
Right, so let me try to explain how its done! (ignore the perspective issues, each square is the same size.

First of all you need to sew your squares together as follows, (ignore the letters on the photo for the moment!)
 
 
So with your 22 squares you need to start with 2 squares turned diagonally, then 3 squares, then 2 squares, and so on till they're all used up.
 
Now comes the complicated (to explain) bit.
Fold it all in half along the x-x line, through the 2 square line.
Then you need to oversew the line joining A-A to B-B, then a-a to b-b.
Then you need to pull points B and D together and sew from there to point C. And also from b/d to c. Then also from BF to E, and bf to e.
Finally pull DF together and sew to X, and df to x.
 
now you should have something that looks like this:-
 
 
Now by sheer fluke you can actually see the bag from the same side as the flat version! Hopefully this will help you to see how it all goes together. Now just have to find/make some handles!


Wednesday 20 February 2013

I've also been making...

Taglets!


Now to be absolutely truthful I had no idea what one was (and technically they are called taggies, or tag blankets but I've renamed my ones), until someone asked me last week if I could make one. Never someone to admit my lack of knowledge I first googled them before telling her of course I could! They come in all sorts of shapes, sizes and materials, but my ones are made from 100% cotton flannelette with double-faced satin ribbons and are roughly 12" or 30cm square, and each one comes with a free initial (as you can just about see on the middle one above.)


I have loads of colours to choose from for both the fronts and the backs (and the ribbons/tags), so if you're interested in buying any pop over to the facebook page and have a nosy around.

Tuesday 19 February 2013

Its been a while....

but I've been so busy, so here's a long post to update you.

Firstly I've been really struggling with the Japanese folded patchwork bag. I tried and tried to work out or find out how on earth the pieces all went together and in the end I posted on the blog of the lady where I'd seen the original picture. Much to my surprise she emailed me back with a diagram of how the squares went and then there was no stopping me! I'd been trying to make it so much more complicated than it needed. It's still taking a while because I'm trying to fit it in around everything else, but we'll get there! I'll post a photo of it in its flat form before I sew it into a bag so you can see how it should look.

Secondly over on facebook the 'A Couple of Crafters' page is really taking off so I've been busy with stuff from there. In particular with the individual bunting flags.

The idea is that each little triangle is completely separate, it can be removed altogether, moved into a different place, or even turned around to show the other side as each one is also reversible.
 
They are held together with cord loops and buttons and are easily separated.

So with just the words 'happy birthday', a name, (Lauren, my granddaughter, in this case), a couple of number flags ('1' and 'st'), and 3 extra letters, 'o', and 's' and ''s', you can make all these variations! (Unfortunately they are a little difficult to photograph as they are quite long!) 
So, with just those letters you could have 'Happy 1st Birthday, Happy 1st Birthday Lauren, Lauren's Bithday, Lauren's first birthday, Lauren is 1 today, or just a plain simple Lauren, for when it isn't Lauren's birthday!


Added to that, I now only have to add four flags,  an 'i', an 'm', a '6' and a 'th', and you could use the whole lot again for her brother Liam when he's 6 later in the year. (we already have the L and the a from Lauren's name)
.
The bunting is completely washable too so will last for years. Prices and ordering instructions are over on the facebook page here


Saturday 2 February 2013

Next step

Now you need to layer your wadding and square of fabric together, and then put in place, wrong side down, in the middle of a circle with the wrong side up.


Then fold and pin the circle onto the square, making sure the sides are even all the way round.


Then stitch in place with a small running/quilting stitch all the way round, taking a few small stitches at the corners to fully enclose the square.


The stitches should go right through the fabric to the back, and no, your eyes aren't going, the photos are of two different blocks!


 And there you go, one block made, backed and quilted, all in one go.  Just another 21 more to finish.

But first I need to go and make tea. Mushy pea curry today! Yes sounds disgusting but it is actually really nice, cheap and very easy to do! (and completely free on slimming world extra easy!)

You need an onion, chopped, more if you wish.  Fry gently in frylight and add spices to taste (none at all if you don't like spicy food!) I add a couple of teaspoons of hot curry powder, 3 or 4 teaspoons of garam masala, some garlic, some chilli paste, salt, pepper and ground chilli flakes, it really is a case of addying whatever you want.
Then add, wait for it, 2 tins of mushy peas, the cheaper the better, a tin of tomatoes, and a tin of baked beans. I mash the beans first, I like the taste but don't like them looking at me! Mix everything together and add some diced chicken, or more veg, or diced lamb or beef, or prawns. Again whatever you fancy, it is a very versatile recipe.
Leave to simmer gently until the meat/fish/veg is cooked, then serve with rice or chips. Looks a bit odd, quite like chip shop curry sauce, but tastes much better.

Busy week. Sorry, long post.

This week seems to have been one of those where you find yourself rushing around but don't seem to have done much at the end of it!
There have been plenty of orders coming through from outr facebook page, also called A Couple of Crafters, which is good, but means time has been taken up with that rather than with playing ;)

However I have now sewn some of the filmstrip together. At one point it seemed like I was cutting my entire stash into little squares!


This is just the first strip. I stitched 3 brown and 2 cream 2" squares together to make a strip, then pressed them and added cream 2" x 8" strips either side. Then I sewed 8"squares to these units, 6 squares in total, each with one of these units either side. I have 5 more of these to do now!!

Then a friend (thanks Sue) introduced us to japanese folded patchwork, and she fetched in a fabulous bag, which I just have to have a go at! Its dead easy, fairly quick, and completely hand stitched and quilted as you go (although no doubt it could be machine sewn to a point).

To make the bag I will need 22 of these little blocks.

First draw round a suitable circle. I used a small plate, could easily have been an old cd, or drawn with a compass. I found it easiest to then make a template from card but if I'd used a cd I might not have bothered, although it did made it easier to remove template when I was finished with it. (read on, you'll see what I mean!)

Once you have your template, if you are using one, or your flat circular object, you need to draw round it onto the wrong side of the fabric, then cut out the circle, leaving a border of about half an inch.

Please ignore the seam down the middle of this one, I ran out of the fabric I wanted to use so ended up with 2 of the circles with joins down the middle. I'm hoping it won't make a difference (I'll let you know!).


Once you've done this you need to run around the outside edge with a running stitch. Make sure the thread you use is fairly strong as you are going to be pulling on it to gather it up.

 
Slip the cardboard circle, or whatever you are using, into the middle of the wrong side of the circle, and pull the gathering stitches so that the circle is enclosed. . If you have used card, or something flexible to make your circle you can then tie/stitch off the ends, if you've used something rigid like a cd you'll need to leave the end loose for the next step.
Iron the circle flat. Iron both sides, making sure you have a nice flat edge. Now you can take out the template. If you have used card you can bend it to get it out, if you have used something rigid you'll need to slightly undo the gathering stitches to take it out then re-tighten them and finish off the threads.
 
Give it another iron just to make sure its all nice and flat once you have taken out your template.


The next step is to cut out your contrasting squares. You need a square which will just fit into the circle, like this.


In my case this was a 5 1/4" square. I'm fairly sure I remember there is a mathematical way of working out the size you will need, something to do with radius of the circle and diagonal measurement of the square. However I just fiddled with my square ruler till I found what fitted! Its been a long time since I had maths lessons at school! 

You will need one of these, and a square of wadding the same size for each circle.. one down 21 to go!

Saturday 26 January 2013

New beginnings

First of all I'd like to introuce a new facebook page, here. Not completely sure if it'll work or if you have to be logged in yourself to see it, if so then please just search for 'a couple of crafters' next time you log in, and click like, if you like :)

Secondly I'm starting a new quilt. It's a bit of an open secret but I'm sure the recipients won't be looking here so should be safe to share!
 Firstly it has to be brown.
Hmm, not really my usual thing but I'll give it  a go.
I've got together a collection of browns and a cream, without putting any pink in! A bit of an achievement fo me but I don't think they'd appreciate it. Ok One of the fabrics has a few pink dots, but very muted, honestly!

The next thing is a pattern. Now I didn't want anything too complicated but I wanted it to be stunning so I thought about the filmstrip pattern I had found online and adapted slightly to make my sister's quilt.

 
Its simple to do and looks great, but I didn't really want to do the same thing again, so I did a search again for images of filmstrip quilts and found one entitled Cathy K's quilt. Its fab, go and have a search for it. I would've put a link but wasn't too sure of the legalities!
 
Anyway I used that as a base then spent a happy hour yesterday morning trying to come up with a pattern, and here it is.
 
 
Well part of it anyway. So far I've worked out I need 42x2" squares of each of the 7 brown fabrics I am using, and you don't want to know how many cream ones!! I'll let you know how it goes!


Wednesday 23 January 2013

Bunting

I've asked around and lots of people thought that my idea of 'loose' bunting was a good one so I've been playing around with it.

I like the way that you can change what it says to suit what you need rather than buying lots of different ones

I like the way its reversible so you can hang it in a window, or from an archway, where both sides will be seen

Anyway, what do you think


Monday 21 January 2013

Crochet crochet crochet

I've become a little obsessed with crochet!
I learned many years ago as a child and can vividly remember teaching myself to make yellow, brown and orange granny squares which I made into a fringed waistcoat! Yes, seriously!! I thought it was FAB. No photos though, sorry :)
Now I have a ripple blanket on the go


as well as a japanese flower scarf

 
 and I'm not happy as I've run out of the yellow yarn for the ripple so can't work on it tonight :(  

Tuesday 15 January 2013

Just a quickie,

Do not look here if you are likely to be distracted!

Loads of lovely things to inspire you so maybe best not to look if like me you have loads of thngs on the go, or in the pipeline!!

At last, I'm posting!!!

I know I've been promising for ages to do this, but better late than never. Here goes.

Lets get some photos of what I have been doing. Firstly the Bethlehem Stitch-along Now, I LOVED doing this, until it came to adding fabric. Lost count of the number of times I rang mum in tears. Perhaps it wasn't the best project for a complete novice to start with. I can hand embroider with no issues, the same with making bags etc out of fabric. But put the 2 together was a bit of a stretch!
This was when the fun stopped for me! LOL!!!
Mine now looks nothing like the original because I had great trouble with the patchwork squares for the boarder. No matter how I measured the seams etc, the blocks just wouldn't measure what they were supposed to. But, to be fair, I do actually love the finished hanging. Unfortunately, it's in the November Box in the loft, so unless I can persuade Chris to do up for me, then the finished photo will have to wait until November!

Next project was to make as many Christmas presents as i could in a bid to save money. Strange how you never actually save money though!

I found a fab cushion pattern on this site www.youcanmakethis.com. I ended up making 11 of these cushions and from the feedback, everyone loved them. Below is 2 of the ones i made. I only made the 2 different sizes but I had to work it out from the name sizes + borders + seam allowance. Again, as a novice, I did struggle (think I cried at mum about these too!!!) with the zips! Boy, they were hard work. In the end I kind of cheated and put them in the middles of the backs instead of at the side where I originally wanted it.


The above Mr&Mrs cushions were made for our parents and my brothers and partners.

I then needed some smaller presents. My husband, Chris is a teacher and he always buys something for his TA and then a little something for the other 2 TAs in the year. For his TA and one of the others, who is more of a friend, I made the Sugar Loaf bags by Lisa Lam.

These made a fab present. Again, I struggled (everything on here seems to be a struggle!!! lol but I do enjoy it) with making this. But I persevered and I'm really glad that I did. I LOVE them. Fit perfect in a hand bag. I made 3 of these in the smaller size. I was meant to keep one for myself, but ended up giving the other one to another TA friend. I'm sure thats not the first, or the last, time that I make an extra item for me to only give it away, ay mum! lol

Next I needed to make something for a good friend who is owl mad! So I bought the below pattern from the same place as the name cushions.
I have made more colour combonations of this owl and ended up selling the spares for friends children They went down a storm.


I then started making snakes! My 2 nephews birthdays are in December, so buying for birthday and Christmas can be a bit tricky. So I made them matching snakes (and gave sweets! What sort of Auntie would I be without sweets!)


Then my In-Laws saw them and said a giant one would be ideal for my Sister-In-Law who lives in Australia. She is very used to the warm weather out there, so when there is a little chill, she does really feel it. They said that she has a nasty draft under a door, so a draft excluder size one would be ideal. Unfortunately, I only have a photo taken in the evening on my phone, but will post it anyway.

It ended up being longer than the door, but I still loved it and so did Katie. Not sure what her cat, Anna, made of it though.

I also made a couple of bags for 2 of my closest friends. But in my haste to get them finished I've forgotton to take a photo. I do have one though (I started using it before I gave it away!!) so I will get a photo of it. I also made a Japanese Knot bag and will get photos of that too.

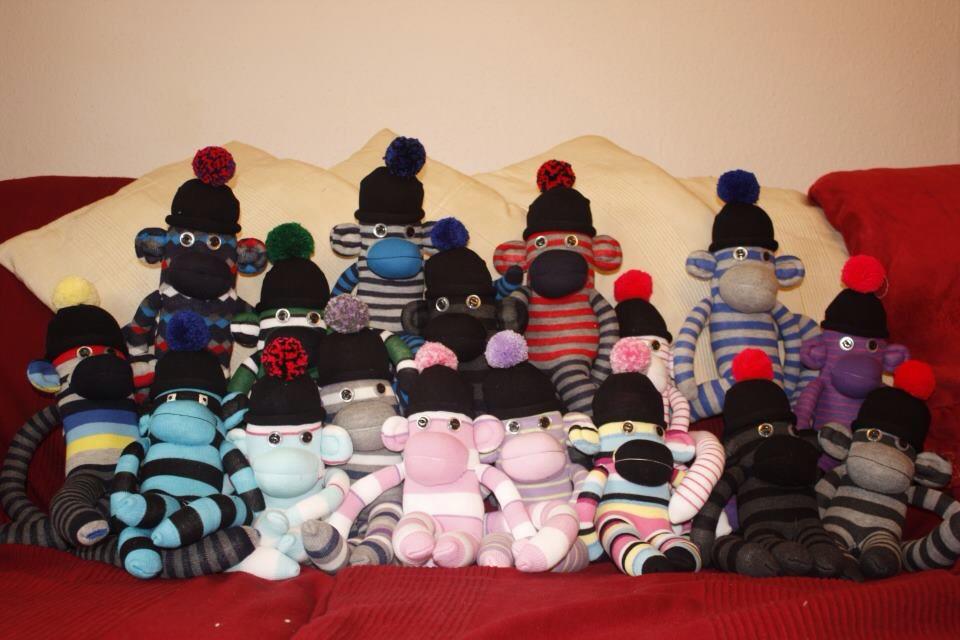
Last Christmas I made LOADS of sock monkeys. One lady put in an order of 17! This is the photo she sent me before wrapping them all up. She put in another order this Christmas for 2 little boys who are new in the family.

I also made owl keyrings which were very popular. I also thought it would be a nice present to make for Chris's class one Christmas. So I made 29 Sock Owl keyrings. I vowed never to make that many in one go again!

I also try crochet now. I'm doing the Granny Stripe that Lucy at Attic24 has made. I am 4 stripes from starting the border. I can't wait. 

 Its a lot longer now! I'll take an update photo ASAP. This is my first crochet project. I have done a few other items in between, such as Lucys Happy Flower Decoration and Birdie Decoration. I loved making those, once I got used to crocheting in circles! YouTube to the rescue!

Another owl project (I can see a theme forming!!) This was one of the VERY first things I made. I bought the pattern when I went to Birmingham NEC with mum.


 And finally.................
I'm sure we all have a project that we have started and not finished. Well here is mine....

 It has progressed slightly from this. I have actually started the stitching around the leaves. Maybe I'll get this done in time for Spring to go in the hall. What a good idea!


Saturday 12 January 2013

Bunting

Lying in bed the other night I had an idea, as you do, and couldn't wait to get stuck in (before I forgot all about it and it languished forever, unmade, along with all the other ideas which were really great at the time...).

Now I can't understand why he made such a fuss about putting it on his bedroom door, I can't see why its uncool for a 13 YO boy, but then I'm not a 13 YO boy I suppose. Anyway I insisted, although I did mollify him somewhat by telling him it was a prototype, the first ever, and it was all his!! I think it worked, well he stopped moaning anyway, and he hasn't taken it down yet even though I insisted on it being on the outside so I can see it too !!

Anyway, it took a few attempts, but here it is...


(not on the door, obviously, its too dark in the hallway to take a photo)


and close-up.....I have great plans for this idea, I'll keep you updated.

And just look at this bunch of loveliness..


Now this was a leap of faith in Lucy over in the attic. As I mentioned a few days ago I saw the Japanese flower scarf over on her blog and fell in love with it. I tried it in wool from my stash but it was only ok, not fab, so I took the plunge and ordered the wool she used, over the internet, without seeing/stroking it first. All I can say is WOW!! The photo doesn't do this justice at all, the colours are beautiful and it is sooooo soft! It isn't even much of a problem that I haven't got time to do anything with it for a few days - it looks lovely just as it is, and I can have a stroke every time I walk past it.


I also have a HUGE thank you to make to a lady called Judy over in her Very Fine House. I have been following her blog for a whileand was browsing there the other day and it was her who rekindled my interest in Lucys scarf. I have seen loads of very interesting and inspiring things there including her beautiful Museum Medallion Quilt which I discovered purely by accident on someone elses blog! It is a stunning quilt, a quick google image search for museum medallion quilt should show you exactly what I mean! I can't wait to make a start on this, especially as Judy has been kind enough to send me a copy of the pattern. Once I get myself organised I intend to do a pastel version, mainly hand pieced. Great to sit in the garden with when summer gets here. April 20th and 21st, I think is earmarked for summer this year! lol

Thursday 10 January 2013

Wavy ripple blanket

I saw this over in Lucy's Attic a while ago and wanted to have a go but  have been dithering about colours. I finally started it a few days ago but didn't like my colour choice - luckily it was all from my stash so I hadn't been and bought it specially, it will get used at some point. I then decided to do a coastal blanket with sort of blues, sands, white, grey etc etc but didn't have the wool and wasn't really confident enough on how it would look to go and buy some more. So...I decided to go back to my very first plan of some time ago and do a rainbow version.

Finally made a start although I have made a slight alteration, which I think will make the ripples a bit more, well, ripply! I've increased the number of plain stitches in between the increases/decreases to 6. It remains to be seen how much of a difference it will actually make!


Also because I have started this several times I was a bit fed up with counting the chains for the foundation so to be a bit lazy I began a chain with a different length of wool and then started doing the foundation row into that as I was going. I joined the wool I was going to crochet with to the beginning chain, then made 3 starting chains, did 1 treble into the first of the starting chains and then carried on  down the rest of the foundation chain following Lucy's instructions. Not sure if this sounds very clear,


or if this picture makes it any clearer!! :)


Also, talking about buying wool specially, I fell in love with the japanese flower scarf in Lucys attic too (I had a day in bed with a cold earlier in the week and spent most of it in Lucys archives!). I did sort out some wool which I thought would do, made a couple of the flowers by following links to a diagram, yes I followed a diagram, and actually managed to join-as-you-go, but it just wasn't right. I was disappointed that it wasn't looking as nice as Lucy's. So after an internet search for the best buys I am now eagerly awaiting the postman.......I'll keep you updated :)